Adventures with Raspberry Pi3 #1: Running Unix v7 on an emulated PDP-11
How to run Unix Version 7 in an emulated PDP-11 on a Raspberry Pi.
Thu Apr 14 2016 23:00:00 GMT+0000 (Coordinated Universal Time) 6 min readI bought a Raspberry Pi 3recently. For those of you that don’t know, the Pi is a tiny and affordable (US$35) computer (roughly the size of a credit card but thicker) created by the Raspberry Pi Foundation, for the purpose of teaching children about computers and programming. Since then, the foundation has sold over 8 million of these devices and many hobbyists have used the Pi as a foundation for interesting and creative projects.
Despite the tiny size, the Pi 3 is a surprisingly powerful computer and can be used as a desktop computer running Linux – in fact, I am currently typing this article on the Iceweaselbrowser running on Raspbianoperating system (which is based on Debian). It has a 1.2GHz 64-bit quad-core ARMv8 CPU and 1GB of memory, and is roughly comparable to a high end Intel Pentium III in terms of integer single core performance.
One of the thoughts that occured almost as soon as I unpacked the computer was “I wonder if it will emulate a PDP-11 running Unix Version 7?”
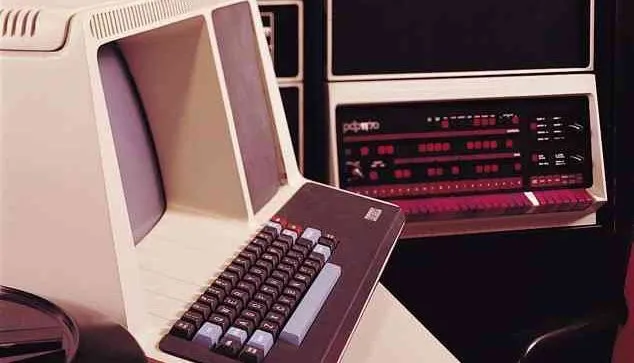
Why PDP-11?
Some people consider the PDP-11 – originally introduced by Digital Equipment Corporation in 1970, as the most popular mini-computer ever made. For many computer scientists of my generation, it was the mini-computer they were introduced to at university. It is so popular it is still in use today and recently there was even a job ad advertising for PDP-11 assembly programmers.
The PDP-11 introduced many concepts that have now become standard in the computing industry – an 8-bit byte, memory mapped I/O registers, and most importantly, a highly “orthogonal” instruction set architecture that made it easy to program in assembly/machine language.
Even more importants, the PDP-11 has long been associated with the Unix operating system and aspects of the PDP-11 have influenced the design of the “C” programming language and Unix itself. In other words, the PDP-11 is the true ancestor of all modern computers and CPUs, more so than computers before and after it. Anyone who uses a smartphone today (iOS and Android) can trace elements of the smartphone design back to the PDP-11.
Why Unix Version 7?
I was introduced to Unix in my first year at university, and instantly fell in love with it. Prior to that, I had been exposed to scientific calculators and home computers. Unix was powerful and sophisticated compared to them, but also had an elegance and a simplicity that was beguiling.
This is the Unix philosophy: Write programs that do one thing and do it well. Write programs to work together. Write programs to handle text streams, because that is a universal interface.– Doug McIlroy
In these days of bloated Linux distributions, it is all too easy to forget what the “Unix philosophy” stands for. Unix Version 7 is probably the closest to a “pure” version of Unix. It was the first version of Unix that we would recognise today as Unix – it had the shell, it’s mostly written in C, all the core software tools are there, and it has none of the crazy stuff that came later. Or, to paraphrase Obi Wan Kenobi:
“Unix Version 7. This is the weapon of a true Unix guru. Not as clumsy or random as Linux; an elegant weapon for a more civilized age. For over a zillion clock cycles, Unix gurus were the guardians of peace and justice of the Internet. Before the dark times… before Microsoft Windows.”
Emulating Unix Version 7 on a PDP-11 on the Pi
Fortunately, there is an excellent PDP-11 emulator written as part of the Computer History Simulation Project. The V7 distribution tapeimage is also available as part of the Unix Archive.
The plan is to do a full Unix 7 install from the distribution tape on a simulated PDP-11/45.
The first step is to install the simulator on the Pi. Then we grab the distribution tape and uncompress it into the pdp11 directory.
sudo apt-get install simh
mkdir pdp11; cd pdp11
wget http://www.tuhs.org/Archive/PDP-11/Distributions/research/Keith_Bostic_v7/v7.tap.gz
gunzip v7.tap.gz
Now we start the simulator and emulate a PDP-11/45 with an RP06 disk drive and TU10 tape drive. Note that it’s important to say yes to the prompt for overwriting the last track (otherwise we will get an error when we initialise the /usr filesystem).
pdp11
PDP-11 simulator V3.8-1
sim> set cpu 11/45
Disabling XQ
sim> set cpu idle
sim> set rp0 rp06
sim> attach rp0 rp06.dsk
RP: creating new file
Overwrite last track? [N] y
sim> attach tm0 v7.tap
Now we boot the PDP-11 and basically follow the instructions provided in “Setting Up Unix – Seventh Edition” document in the original manual (PDF version availablehere)
Note: the instructions ask us to type in about 6 lines of machine code in order to create a bootstrap that will boot from the tape drive, but fortunately the simulator already has that included so all we need to do is just use the boot command, then initialise the root filesystem on the disk, followed by copying the root filesystem data from tape to disk:
sim> boot tm0
Boot
: tm(0,3)
file sys size: 5000
file system: hp(0,0)
isize = 1600
m/n = 3 500
Exit called
Boot
: tm(0,4)
Tape? tm(0,5)
Disk? hp(0,0)
Last chance before scribbling on disk.
End of tape
Boot
:
Now we boot Unix from the disk, create the /dev entries corresponding to our devices, create the /usr filesystem and restore it from tape:
Boot
: hp(0,0)hptmunix
mem = 177344
# STTY -LCASE
# cp hptmunix unix
# cd dev
# make rp06
/etc/mknod rp0 b 6 0
/etc/mknod swap b 6 1
/etc/mknod rp3 b 6 7
/etc/mknod rrp0 c 14 0
/etc/mknod rrp3 c 14 7
chmod go-w rp0 swap rp3 rrp0 rrp3
# make tm
/etc/mknod mt0 b 3 0
/etc/mknod rmt0 c 12 0
/etc/mknod nrmt0 c 12 128
chmod go+w mt0 rmt0 nrmt0
# /etc/mkfs /dev/rp3 322278
isize = 65496
m/n = 3 500
# dd if=/dev/nrmt0 of=/dev/null bs=20b files=6
202+80 records in
202+75 records out
# restor rf /dev/rmt0 /dev/rp3
Last chance before scribbling on /dev/rp3.
End of tape
# /etc/mount /dev/rp3 /usr
# dd if=/usr/mdec/hpuboot of=/dev/rp0 count=1
0+1 records in
0+1 records out
#
Note that by default Unix V7 assumes the lowest common denominator for the console: an uppercase only teletype machine. We use the stty -lcase command to let Unix know our console supports lower case!
That’s pretty much it! Unix is now fully installed, and we can exit single user mode and start multi-user mode with the login prompt:
RESTRICTED RIGHTS: USE, DUPLICATION, OR DISCLOSURE
IS SUBJECT TO RESTRICTIONS STATED IN YOUR CONTRACT WITH
WESTERN ELECTRIC COMPANY, INC.
WED DEC 31 19:10:05 EST 1969login: root
Password:
You have mail.
#
Note, future startups using the simulator can be as easy as the following (this time, I am simulating a PDP-11/70 with a whopping 2 megabytes of memory):
boot
Boot
: hp(0,0)unix
mem = 2020544
# RESTRICTED RIGHTS: USE, DUPLICATION, OR DISCLOSURE
IS SUBJECT TO RESTRICTIONS STATED IN YOUR CONTRACT WITH
WESTERN ELECTRIC COMPANY, INC.
WED DEC 31 19:10:38 EST 1969

login: